Posted on June 03 2022
Although there are plenty of ways to enjoy your flower, few are as classic as a nice doink - or as my mom calls it: a "jazz cigarette." It's a gold standard for a reason! However, it takes a certain level of skill to make one and not everybody’s got the necessary finger dexterity. There's gotta be an easier way, right?
Sure, you could buy pre-rolled cones to stuff with your homegrown, but they’re more expensive than standard papers and don’t always come in the size or flavor or type that you want. What if you wanted to use Juicy Jays vs RAWs or you had some free papers gifted with a purchase or at an event? Or what if you want to use mint leaf or rose petals or other specialty herbal material?
Well good news! There’s a simple, affordable, and easily customizable option for you that we sell here at Green Goddess Supply - our rosewood cone maker. With it, you can easily turn whatever your preferred papers are into a quickly-stuffed cone!
The Rolling
Start by gathering all of your accessories for rolling: Your favorite papers, maybe some filters, your grinder, a lighter - preferably a clipper to utilize it’s poker (but alternatively a basic plain pen will do), your cone roller, a rolling tray, and of course your herb du jour.

Place your flowers into your grinder and spin it until you have everything broken down. If you’re looking to be fancy, this is the time to mix in other herbs as well - we recommend trying to keep everything ground up to the same amount of “choppiness" so that it burns evenly later. You can also mix in concentrates such as dry-sift pollen to help boost the potency and mix it in evenly.
Technically when it comes to how well your bone will smoke, a fine grind is less preferable to a slightly choppy one as it allows better airflow, but you will find your own preferences. Keep in mind that the finer the grinder, the quicker it will burn.

From here, you’ve got a few options of how to make your cone complete and finish the job.
Option 1: Rolling with a Filter
Fold up along your paper filters into a zig-zag pattern - no more than 1-3mm in size. This will act as a filter later preventing ground herb from sliding into your mouth - this way you don't need to taste any "Scooby Snacks."
You only really need about 4-5 folds for your filter. Take that folded side and wedge it into the open slot at the bottom of the cone roller - leaving the long, unfolded section to hang off to the side.

Now, wrap the long section around the outside of the cone roller and squeeze it tight. Make sure to test that it can somewhat easily slide out. If it cannot, undo 1 or more folds and put it back into the slot - it should slide out without too much effort.

Take your preferred papers and wrap it around your cone roller - with the paper filter piece lined up with the end. Be sure that where it wraps around, the sticky gum part will not be touching any of the wooden cone roller, it should be rolled evenly so that the papers do not get stuck! Also be careful to pinch together as seen below, so that it doesn’t unravel as you seal it up.

Next, lick along the gum line and continue folding over the papers to complete the pre-roll shape and locks on tight. Run your finger along it to make sure it's pressed flat.

Immediately slide your papers off of the cone roller only a few seconds after finishing. Carefully pull it from the filter end with one hand and hold the cone roller in your other hand - on the bare end.
If you wait too long, it could potentially become stuck or difficult to remove after the gum has dried - especially if part of the gum-line touches the cone roller itself and gets stuck to it. Pinch from where the paper filter is and slide it downwards carefully.

Set aside your cone for about 10-20 seconds or so to allow the gum to finish drying. This will make it slightly easier to pack because if you don't wait at all, you might accidentally stuff too hard and separate the glue from the rest of the papers.
Skip past Option 2 for rolling your cone to The Stuffing if you've been doing this method so far.
Option 2: Rolling without a Filter
This slightly different method is ideal if you want to use non-paper filters (like regular cigarette filters or glass tips).
Take your preferred papers and wrap it around your cone roller - with no paper filter rolled onto it yet. In this option, we put the filter in at the end. Be sure that where the paper wraps around, the sticky gum part will not be touching any of the wooden cone roller, it should be rolled evenly across the back part of the papers. Also do not pinch / roll tightly at the mouthpiece but instead roll from the middle of the papers along the cone roller.

Unlike in the picture though, use both hands to roll the papers onto the cone roller from either end of the papers - this ensures a tight seal.
Lick the gum line and continue folding over the papers to complete the pre-roll shape. Be careful if your gum sticks to the cone roller - try to avoid it like in the picture below. If that happens like in the picture below, quickly peel it off the cone roller before it adheres to it.

Slide your pre-roll off the cone roller immediately - only a few seconds after finishing. Set aside your doink for about 10-15 seconds or so to allow the gum to finish drying. This will make it slightly easier to pack and less likely to unravel.

Now fold your paper filters into a zig-zag pattern - no more than 1-3mm in size. You only really need about 4-5 folds. You can also wiggle and slide in other filter options if you prefer - but if it doesn't condense a little or isn't the exact right size of your roll, it won't fit in the mouthpiece area.
Keeping the filter folded together, roll up the remaining section as tightly as possible into a tube shape. It’s very skinny, so it can fit inside the papers, but when you let go it will unravel to the needed size. It should fit into the paper if you continue pinching the filter tightly until it’s at least halfway inside, then just scoot it the rest of the way in.


The Stuffing:
Pull upwards on your Clipper lighter’s flint and behold - it’s actually a long piece that can be used to stuff your bone before being put back in to make sparks for fire. Not a lot of folks know Clippers have this function but it’s a great option for stuffing! You can technically use another tool so long as it fits inside the opening.

Lay your cone on its side, the opening facing the pile of ground up flowers. Use your clipper lighter piece to push just a little bit of the flower into the cone. Stuff down to the mouthpiece well (you may want a pen or chopstick or other poking device for longer pre-rolls).

Tamping the flower down is something of an art and shouldn’t be done too hard or too soft but at this point, it’s okay to tamp down more than you would in the middle or end sections of your pre-roll. You need less and less force the further along the doink you go or else you risk it not smoking well - where you suck hard but not much comes out. It should be lightly packed by the mouthpiece and a bit more tightly packed towards the end you light.

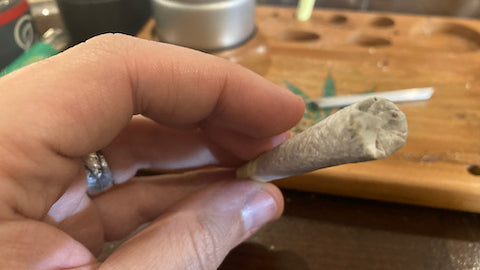
Continue to fill it until it’s close to the end - you now only have to finish off the tip. You can technically twist the end or even light it up as is, but my own preference is with a seal on the end.

Fold down the edges towards the middle, going around in a circle until you have a flat top. (You can alternatively spin the end into a wick to make a more classic looking smoke, but the flat top will ultimately burn better and with less runs down the sides that require adjusting.)

You now have a pre-roll ready to go! Enjoy immediately or store to use later… Just remember that when sharing with others, pass to the left and try not to get too much saliva on the mouthpiece.
By: Kyle Hamilton, Concierge Service Overlord at Green Goddess Supply